

Few weeks ago, when my good friend Joyce posted her bake of this magic custard cake in her facebook, I was curious and wonder why it is called a magic cake. She explained to me that three different layers were formed when the cake is baked. I thought, "Wow, what an interesting recipe, I gotta try it!"
I got the recipe from her and baked it yesterday specially for my daughter who has completed her school preliminary examinations. I added Matcha powder to the recipe to make a Matcha flavoured one as I am in the series of making matcha bakes. You can take a look at my earlier posts if you are a Matcha fan like me.
When I was making this cake, it was so watery (my friend has forgotten to warn me about this) that I wondered if I have read the ingredients and measurements correctly. Anyway, I moved on to make the meringue and folded it into the watery batter. Things got worst, the batter became very curdy and I thought I have ruined it and was on the verge of discarding it when I changed my mind. (thinking it was such a waste to pour away!) I tried my best to fold the whites in with a hand whisk (switching from a silicon spatula) until there were no big curds around. Frankly speaking, I was not hopeful that the cake will turn out alright. I just wanted to see the outcome thus went ahead and put it into the oven to bake.
To my surprise, not only did the cake turned out fine, it was truly magical! There were three layers of different texture, the top layer is like a soufflé cake (it will rise when baked and sank when taken out of the oven), the centre is a soft custard layer and the bottom is a denser 'kueh' (a type of chinese/malay cake) texture. When the cake was cooled down, I couldn't wait to help myself to a piece, it was so delicious that I took another helping. Not only does it taste good, the sweetness is just right too!
From what I know, the recipe is originated from Spain. Hope you will like this cake as much as I do and it tastes good either warm or cold.
首先要在这感谢我的好姐妹Joyce了与我分享这英文的食谱。
昨天为了庆祝我女儿考完小六的初步考试,决定做这个蛋糕。
不瞒你说,在制做这蛋糕时,因为面糊是水水的 (朋友忘了提醒我这点),我还以为我看错了材料的份量,差一点就把面糊拿去喂 Mr Bin了!。不过想继续做下去,看加入打发到硬性的蛋白霜,会不会好一点。 没想到,面糊加入了蛋白霜后有好多大大的凝块!我心想:这下子更糟了,怎么办?是不是真的该把它给倒掉了?想想后又觉放进预热好的烘炉。 当时并不是很乐观蛋糕会成功。 过了大概得很浪费, 就拿起了手拌器,尽量把大块的固体搅拌散, 再一小时,把烤好的蛋糕拿出一看, 真的有三层!太高兴了,糊里糊涂的成功了,哈哈!蛋糕的上层象是Souffle的味道,中层是软软的卡士达,下层象Kueh的质感。口感很棒,你会不知不觉地吃下好几块呢!这么神奇又好吃的蛋糕一定要试做,并不难哦!
据我所知,食谱的来源是西班牙。希望你会和我一样喜欢这个蛋糕。它的味道不管是刚烤出来或放进冰箱后,都一样好吃, 赞不觉口!我和家人都很喜欢,一定会再做。
Please watch the tutorial video before attempting this cake:
请参考做这蛋糕的视频:
Please watch the tutorial video before attempting this cake:
请参考做这蛋糕的视频:
Matcha Magic Custard Cake (makes a 8" square pan)
抹茶魔术卡士达蛋糕
抹茶魔术卡士达蛋糕
Ingredients:
113g unsalted butter (I used Echire Doux French butter)
485g fresh milk
1 tablespoon water
4 eggs, separated (60g each, weight including shell)
100g plain flour
15g premium Matcha powder (replaced with plain flour for original flavour, replace with unsweetened cocoa powder for chocolate flavour)
145g icing sugar
2 Tbsp caster sugar
1 tsp vanilla extract
Extra icing sugar for dusting (I use snow powder, which will not melt when put into the fridge)

主料:
113克 无盐牛油 (我用上等的Echire法国牛油,味道更佳)
485克 鲜牛奶
1大匙水
鸡蛋4粒,分隔 (每粒60克包括壳)
100克 普通面粉/中筋面粉
15克 上等抹茶(可以由普通面粉取代做原味的或用无糖可可粉取代做巧克力口味的)
145克 糖粉
2大匙砂糖
1茶匙香草精
额外的糖粉,洒在蛋糕上层。(我用放进冰箱不会融化的 Snow powder)
113克 无盐牛油 (我用上等的Echire法国牛油,味道更佳)
485克 鲜牛奶
1大匙水
鸡蛋4粒,分隔 (每粒60克包括壳)
100克 普通面粉/中筋面粉
15克 上等抹茶(可以由普通面粉取代做原味的或用无糖可可粉取代做巧克力口味的)
145克 糖粉
2大匙砂糖
1茶匙香草精
额外的糖粉,洒在蛋糕上层。(我用放进冰箱不会融化的 Snow powder)

Method:
1. Preheat the oven to 160ºC. Lightly grease and line a 8"x8" baking pan with baking paper.
2. Melt the butter and set aside to cool slightly. Warm the milk to lukewarm and set aside.
3. In a separate bowl, sift flour and matcha powder together.
4. Use an electric mixer and whisk the egg whites till foamy, add in the caster sugar and whisk till stiff peak. (make sure there is no oil or water in the bowl, the egg white must not come into contact with any egg yolk, water or oil too or the meringue will not be succesful.)
5. In another bowl. beat the egg yolks and icing sugar until light and fluffy.
5. In another bowl. beat the egg yolks and icing sugar until light and fluffy.
6. Add in the melted butter and one tablespoon of water and beat for about 2 minutes or until evenly incorporated.
7. Mix in the sifted flour until evenly incorporated.
8. Use a hand whisk and gently beat in the milk and vanilla extract until everything is well mixed.
9. Fold in the egg whites, 1/3 at a time. Repeat until all of the egg whites are folded in. (The batter will appear curdy, just fold till no big curds are seen)
10. Pour the batter into the prepared pan and bake for 50-55 minutes until the top is golden, test with a skewer which comes out clean, the cake is done.
11. Allow cake to completely cool before cutting and then dust with icing sugar.
*** It's a magical cake that forms into 3 layers when baked. The bottom layer is dense and taste like our chinese kueh, the centre layer is soft and custard-like and the top layer is a souffle cake texture. (which is normal for the cake to shrink after cooling down)
Note: It is normal that the batter is runny and after adding in the meringue, it will become curdy. Don't panic, just continue to fold until the curds almost disappear.

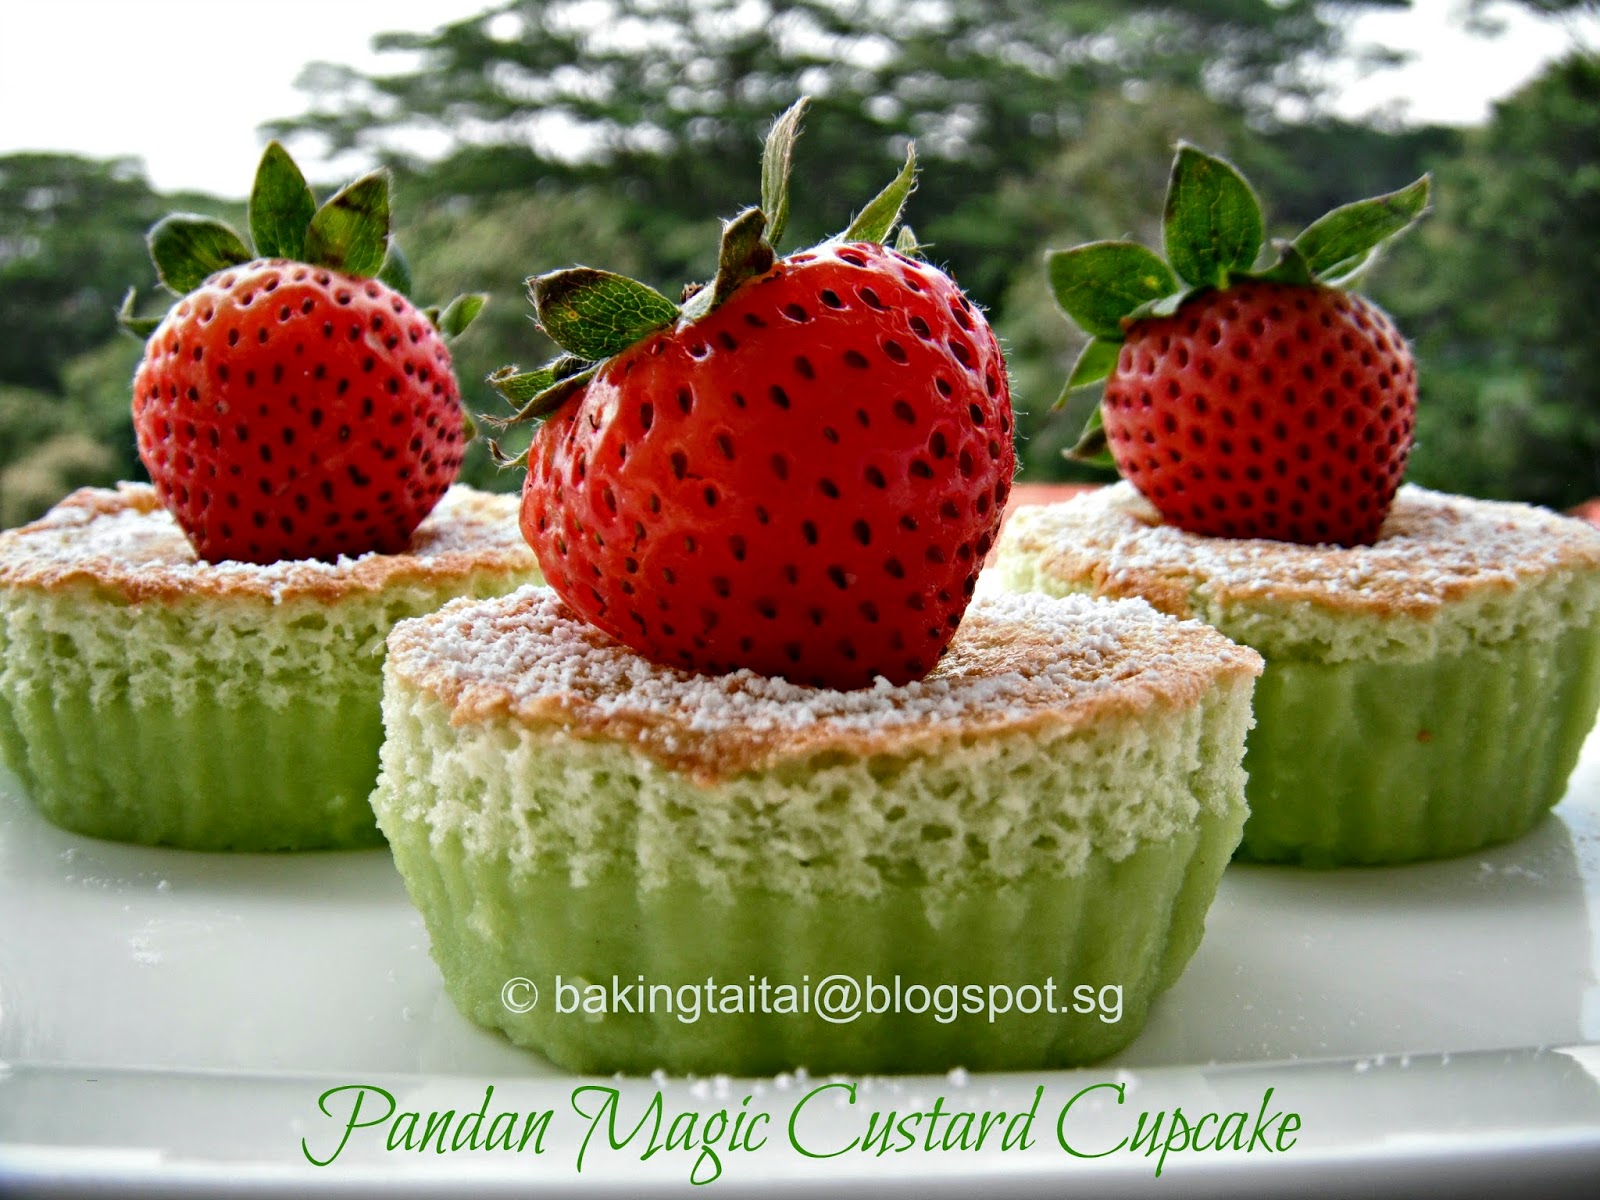
Click on the photo for Pandan Magic Custard Cupcake recipe.

Updated on 7 July 2014 - Conducted my first baking workshop as well as the first ever Magic Custard Cake class organised by LessonsGoWhere on 5 July 2014. Click here to read more.

Updated on 18 Aug 2014 - Conducted my 2nd MCC workshop on 16 Aug 2014. Click here to see more photos of our fun-filled lesson. :)

Frequently Asked Questions:
Qn 1) Why does my cake only have two layers instead of three?
Ans: Please ensure that the egg yolk is beaten till light and fluffy and the egg white is beaten till stiff peak. It is also important to fold in the beaten egg white into the flour-milk mixture using a rubber spatula and not using the electric mixer in this step as it will cause the air bubbles to disappear. Actually, it doesn't matter if the cake only has two layers as it is still a very delicious cake.
Qn 2) Why doesn't my cake rise and even shrank after cooling down?
Ans: This cake does not rise much, the height of the cake is the height of the cake batter when you poured into the baking pan. Please look at the before and after bake photos in step 9. It is normal for the cake to shrink after cooling down as the top layer is a souffle texture.
Qn 3) Can I use a round baking pan with removable base instead of a square one?
Ans: Yes, you can. You have to lay the baking paper all over the pan properly and put a layer of aluminium foil to wrap the exterior of the base pan so that the batter will not leak out.
Qn 4) Can I use a square pan without a removable base?
Ans: Yes you can. Make sure the height of the baking paper laid is taller than the pan so that you can lift the cake out easily to cool on a wiring rack.
Qn 5) Why does my cake collapse when I cut it?
Ans: This cake is soft and wobbly when out of the oven. Please cut it only when the cake has cooled down completely.
Qn 6) Why does my cake surface crack during baking?
Ans: You have to bake at a lower temperature and longer time as the suggested temperature is too high for your oven.
Qn 7) Why are some layers thicker or thinner than the others?
Ans: This is a one batter recipe, we can't control the thickness of each layer in the cake. It will have to depend on the magic that takes place during baking.

For original flavour, please click on photo to see recipe. It also has a more detailed write up about the magic custard cake and how the magic works in this recipe.
原味的食谱,请点击照片。食谱也有详细说明蛋糕为什么会这么神奇。
Click on the photo for Pandan Magic Custard Cupcake recipe.
请点击照片看香兰魔术卡士达小蛋糕食谱。

Updated on 22 Sep 2014 -
Nicest and most fragrant - Gula Melaka Magic Custard Cake, click photo to see recipe.
最香也是最好吃的 - 马六甲椰糖魔术卡士达蛋糕,请点击照片看食谱。

Updated on 7 July 2014 - Conducted my first baking workshop as well as the first ever Magic Custard Cake class organised by LessonsGoWhere on 5 July 2014. Click here to read more.
Updated on 18 Aug 2014 - Conducted my 2nd MCC workshop on 16 Aug 2014. Click here to see more photos of our fun-filled lesson. :)

Frequently Asked Questions:
Qn 1) Why does my cake only have two layers instead of three?
Ans: Please ensure that the egg yolk is beaten till light and fluffy and the egg white is beaten till stiff peak. It is also important to fold in the beaten egg white into the flour-milk mixture using a rubber spatula and not using the electric mixer in this step as it will cause the air bubbles to disappear. Actually, it doesn't matter if the cake only has two layers as it is still a very delicious cake.
Qn 2) Why doesn't my cake rise and even shrank after cooling down?
Ans: This cake does not rise much, the height of the cake is the height of the cake batter when you poured into the baking pan. Please look at the before and after bake photos in step 9. It is normal for the cake to shrink after cooling down as the top layer is a souffle texture.
Qn 3) Can I use a round baking pan with removable base instead of a square one?
Ans: Yes, you can. You have to lay the baking paper all over the pan properly and put a layer of aluminium foil to wrap the exterior of the base pan so that the batter will not leak out.
Qn 4) Can I use a square pan without a removable base?
Ans: Yes you can. Make sure the height of the baking paper laid is taller than the pan so that you can lift the cake out easily to cool on a wiring rack.
Qn 5) Why does my cake collapse when I cut it?
Ans: This cake is soft and wobbly when out of the oven. Please cut it only when the cake has cooled down completely.
Qn 6) Why does my cake surface crack during baking?
Ans: You have to bake at a lower temperature and longer time as the suggested temperature is too high for your oven.
Qn 7) Why are some layers thicker or thinner than the others?
Ans: This is a one batter recipe, we can't control the thickness of each layer in the cake. It will have to depend on the magic that takes place during baking.

方法:
1。烤箱预热至160ºC。在8“X8”烤盘上的周围涂油,铺油纸。
2。融化牛油,并隔一边降温。牛奶加热到微温,隔一边。
3。面粉和抹茶粉一起过筛。
4。用电动搅拌器把蛋白打至泡泡状态,加入2大匙砂糖,打到干性发泡的状态。(盛蛋白的盆要保证无油无水,蛋白也不可以沾到蛋黄,水分及油脂。蛋白霜才能成功)
5。另一个碗里,把蛋黄和糖粉搅拌到蓬松。
6。然后加入融化的牛油和水,搅打约2分钟拌均。
7。倒入过筛的面粉和抹茶粉,搅打混合。
8。用手拌器轻轻地打入牛奶和香草精,直到混合。(如果继续用电动搅拌器, 水水的面糊会被打到四处飞哦!)
9。蛋白霜分三次加入面糊中,用手拌器轻轻翻拌均匀。(这时你会看到面糊有好多大大的凝块,尽量把这些大块的固体搅拌散)
10。将面糊倒入烤盘,烤约55分钟,直到表面呈金黄色, 竹签插入中心没有沾粘就可以取出。
11。蛋糕完全冷却后,洒上糖粉就可以享用了!
***这是一个很神奇,能烘出三层不同质感的蛋糕。底层是稠密的,口感像我们华人的粿,中间层是柔软的卡士达,顶部是一个蓬松的蛋奶酥蛋糕。(所以蛋糕冷却后会回缩)
11。蛋糕完全冷却后,洒上糖粉就可以享用了!
***这是一个很神奇,能烘出三层不同质感的蛋糕。底层是稠密的,口感像我们华人的粿,中间层是柔软的卡士达,顶部是一个蓬松的蛋奶酥蛋糕。(所以蛋糕冷却后会回缩)
注意:面糊是水水的,蛋白霜加后会显得凝固,这是正常的,
常见问题:
问1)为什么我的蛋糕只有两层,而不是三层?
答:请确保蛋黄打至蓬松和蛋白打至硬性泡发。重要的是,记得使用橡胶刮刀而不是用电动搅拌器将蛋白霜拌入面糊,因为这会导致气泡消失。其实蛋糕没有三层也不算失败,因为蛋糕还是一样美味可口。
问2)为什么我的蛋糕没涨高,冷却后还回缩?
答:这个蛋糕并不会涨高,蛋糕的高度是蛋糕面糊倒入烤模的高度。请看在步骤9的照片显示之前和烘烤之后的蛋糕。蛋糕的顶层是蛋奶酥所以会回缩是正常的。
问3)可以用活底圆模来做这个蛋糕吗?
答:可以。不过你必须在模内铺好烘焙纸,在模外放一层锡纸包住模底,防止面糊漏出来。
问4)可以用方形固定模来做这个蛋糕吗?
答:可以。请确保在模内铺的烘焙纸,高度比烤模高一些,蛋糕才可以容易拿出来放在凉网冷却。
问5)为什么蛋糕拿出来会回缩,切蛋糕时,蛋糕会倒塌?
答:蛋糕会回缩一些是正常的。蛋糕是偏软的,一定要等到蛋糕完全冷却后才可以切,才不会倒塌。
问6)为什么蛋糕的表层在烘烤时会裂?
答:因为烘烤温度太高了,建议你把温度调低些并烘久一点。
问7)为什么蛋糕的每层厚度不均匀,有些薄,有些厚?
答:因为这蛋糕只是单单一种面糊而烘出不同层次的,所以不受我们的控制,而是烘焙时魔术产生的效果。
English recipe is shared by my dear friend Joyce and I have translated it to Mandarin as requested by my Chinese readers as there is no Chinese recipe on the web yet. Understand that this recipe originates from Spain.
英文食谱是来自好朋友的分享,应中文读者的要求,我把它翻译成中文,因为在网上还没有中文版的。据了解,食谱是来自西班牙。
常见问题:
问1)为什么我的蛋糕只有两层,而不是三层?
答:请确保蛋黄打至蓬松和蛋白打至硬性泡发。重要的是,记得使用橡胶刮刀而不是用电动搅拌器将蛋白霜拌入面糊,因为这会导致气泡消失。其实蛋糕没有三层也不算失败,因为蛋糕还是一样美味可口。
问2)为什么我的蛋糕没涨高,冷却后还回缩?
答:这个蛋糕并不会涨高,蛋糕的高度是蛋糕面糊倒入烤模的高度。请看在步骤9的照片显示之前和烘烤之后的蛋糕。蛋糕的顶层是蛋奶酥所以会回缩是正常的。
问3)可以用活底圆模来做这个蛋糕吗?
答:可以。不过你必须在模内铺好烘焙纸,在模外放一层锡纸包住模底,防止面糊漏出来。
问4)可以用方形固定模来做这个蛋糕吗?
答:可以。请确保在模内铺的烘焙纸,高度比烤模高一些,蛋糕才可以容易拿出来放在凉网冷却。
问5)为什么蛋糕拿出来会回缩,切蛋糕时,蛋糕会倒塌?
答:蛋糕会回缩一些是正常的。蛋糕是偏软的,一定要等到蛋糕完全冷却后才可以切,才不会倒塌。
问6)为什么蛋糕的表层在烘烤时会裂?
答:因为烘烤温度太高了,建议你把温度调低些并烘久一点。
问7)为什么蛋糕的每层厚度不均匀,有些薄,有些厚?
答:因为这蛋糕只是单单一种面糊而烘出不同层次的,所以不受我们的控制,而是烘焙时魔术产生的效果。
 |
| Assorted flavours of Magic Custard Cakes, which is your favourite? |
英文食谱是来自好朋友的分享,应中文读者的要求,我把它翻译成中文,因为在网上还没有中文版的。据了解,食谱是来自西班牙。
Photos are personally taken by baking taitai with an iphone, sometimes with just one hand while working with the other.
食谱由烘焙太太翻译成中文。照片是烘焙太太亲自用iphone拍的。
"It takes time and effort to compose or translate recipes, I would appreciate it if you do not copy and pass it off as your own recipe. If you wish to share or adapt any of the recipes that I have posted in this blog, please provide a link back to the relevant post. Thank you. "
"编写或翻译食谱需要时间和精力的,请不要复制或将它作为自己的食谱。如果你想分享部落格的任何食谱,请至少提供相关的链接,谢谢。“ 
This post is dedicated to Joyce, my very dear friend who shared the original version magic custard cake with me.